
Garden Gazette
Fall 2021
REMINDERS
Take home your child’s sheets and blanket on their last day of school each week, launder and bring back on Monday.
Also, please check HiMama everyday for fun activities and updates about your child all day long!
Please remember to include eating utensils with your child’s lunch/snack.
As the weather gets colder, please remember to send a jacket with your child!
Please remember extra masks for your child!
Upcoming Events
NO SCHOOL: Monday, September 6th, Labor Day!
Halloween Celebration: Friday October 29th, 2021 (more details to come).
I know many of us had hoped this pandemic would be far behind us by September 2021, unfortunately we are still dealing with it! Safe to say we are all tired of this! However, please bear with us as we navigate this new world all together. Please remember to bring a mask everyday, and to follow all health and safety protocols. Our staff and fellow Garden Preschool families really appreciate it during this tough time! Thank you for your understanding!
Lunch Guidelines/Ideas
What Does a Healthy Lunch for Kids Include?
When it comes to toddler lunches, or lunches in general, this is what I typically try to include (with the understanding that not every day is going to be perfect and that’s ok!)
- Vegetables: At least 1 serving of vegetables (the more the better!), cut small. For toddlers, I’ll often steam veggies somewhat soft since they’re easier to chew. For bigger kids you can prepare the veggies any way they like: roasted, sautéed, steamed, raw with a dip or dressing – the possibilities are endless!
- Fruit: 1 serving of fruit, which can be great for a snack or dessert. Try to go for lower glycemic fruits like apples, pears, oranges, berries, and stone fruits. When it comes to fruit, don’t do more than 1 serving for lunch.
- Protein: 1 serving of protein, can be plant-based (e.g. beans, lentils); dairy (cheese, yogurt/Greek yogurt, cottage cheese, eggs); or meat (chopped chicken, meatballs, fish)
- Complex Carbohydrates: The key here is to avoid all white grains. Choose whole wheat or sprouted wheat bread/tortillas/pita/crackers, whole wheat or legume based pasta, and brown rice or quinoa.
- Healthy Fats: Nut butters, Olive oil, Coconut oil, Cheeses, Avocado, Nuts and Seeds are all great options here.
25 Easy Lunch Ideas
Healthy Lunch Ideas: Savory Sandwiches
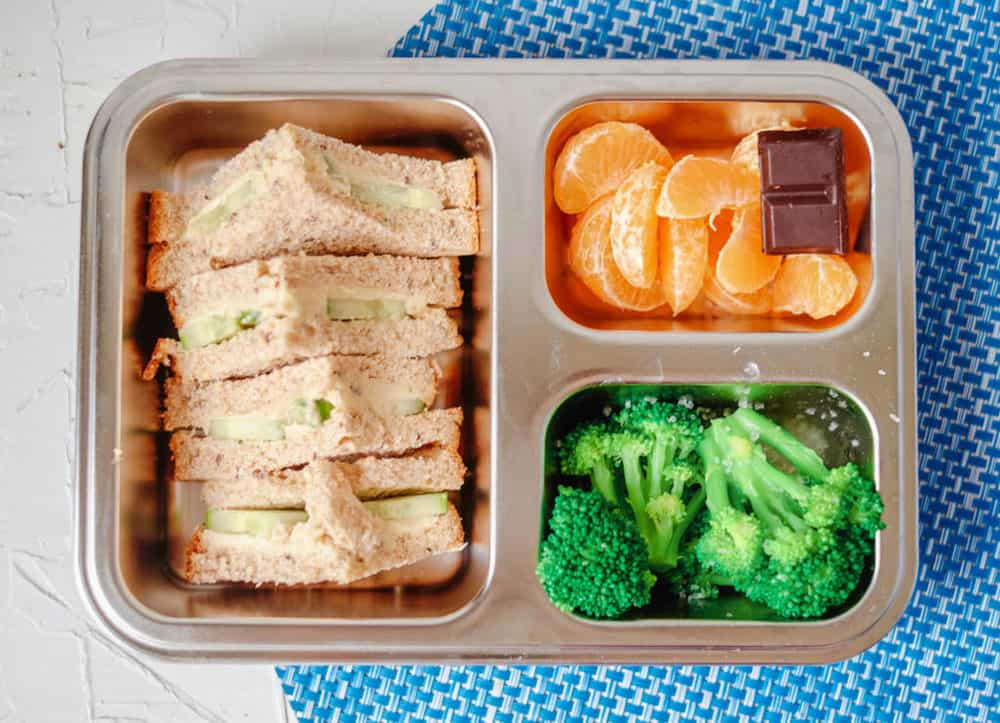
- Hummus and Cucumber Sandwich: Lightly toast two slices of sprouted wheat bread, spread with hummus, top with sliced cucumbers. Serve with your child’s favorite fruit (e.g. mandarin orange slices), and veggie (e.g. steamed broccoli cut into small florets, dressed with olive oil and salt). Optional: a small piece of dark chocolate for dessert.
- Healthy Grilled Cheese: On sprouted wheat bread, with some chopped baby spinach or diced tomatoes mixed into the cheese. Serve with a fruit (e.g. apple slices), and a veggie (e.g. roasted sweet potato “fries” – which can be made in bulk advance and last for 4-5 days in the fridge!)
- Egg Salad or Chickpea Salad Sandwich on sprouted wheat bread, served with a favorite fruit and carrot sticks (or steamed carrots) with hummus for dipping on the side.
- Avocado “Toast” Sandwich: Spread mashed avocado or guacamole on two slices of sprouted wheat bread, top with cojita cheese (or your child’s favorite shredded cheese) and tomatoes. Serve with a few tortilla chips + fresh fruit on the side.
Sandwich Lunch Ideas for Kids: Sweet Sandwiches
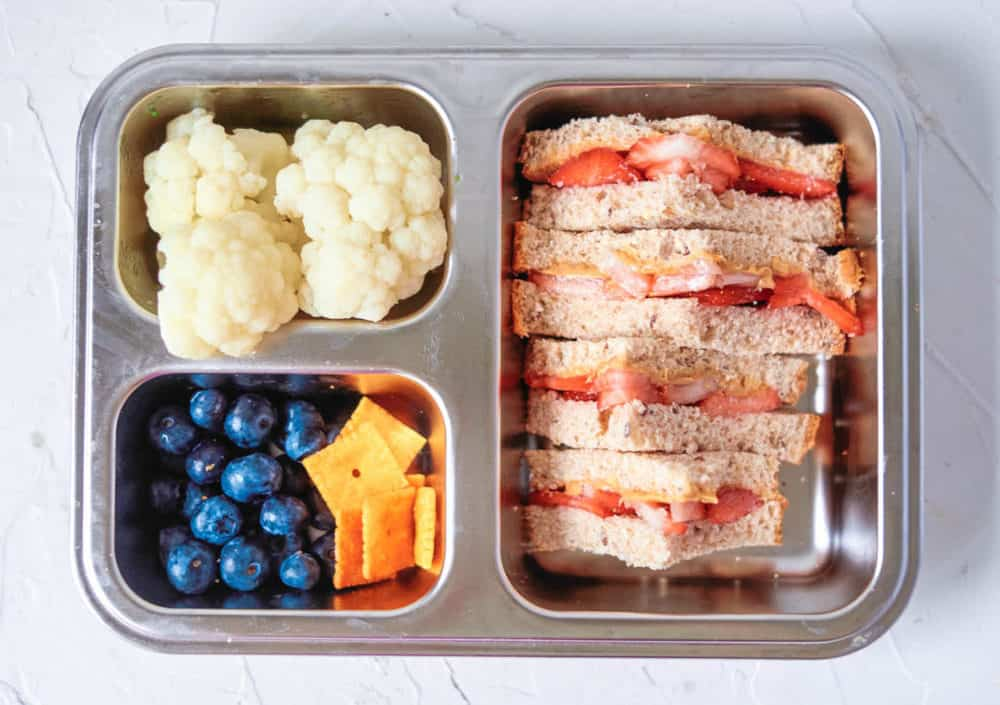
- Nut Butter and “Fresh Jam” Sandwiches! Toast two slices of sprouted wheat bread, spread with favorite nut butter or sun butter, and top with thin slices of your child’s favorite fruit (instead of the jelly/jam) – e.g. sliced strawberries, apples, pears all work well. Serve with some fresh blueberries and steamed cauliflower cut into small florets, dressed with olive oil & salt on the side. Optional crunchy snack: 5-6 crackers or pretzels.
- Apple and Cheddar: Toast two slices of sprouted wheat bread, top with slices of mild cheddar cheese and apples. Can be served cold or grilled (like a “fancy” grilled cheese). Serve with steamed or sautéed veggies (broccoli, squash, sweet potatoes would all work well).
- Brie and Pear (with a drizzle of honey and crushed walnuts!): Toast two slices of sprouted wheat bread, top with brie or your child’s favorite mild cheese + thin pear slices. Drizzle 1 tsp honey and add 1 tsp crushed walnuts on top. Serve with steamed or roasted veggies (or a fresh salad) on the side.
Kids Lunches: Burritos and Wraps

- Bean & Cheese Burrito “Sushi”: Whole wheat tortilla spread with refried black beans, sprinkled with cheese, diced tomatoes, diced bell peppers, rolled and cut into “sushi” like slices. Served with cucumber sticks + hummus + apple slices on the side.
- Breakfast Burrito: Scrambled eggs with some diced bell peppers, tomatoes, and baby spinach mixed in (seasoned with salt + pepper as needed), wrapped in a whole wheat tortilla and topped with shredded cheese. Served with your child’s favorite fruit and crunchy snack on the side.
- Rainbow Wraps: Spread cream cheese on a whole wheat tortilla, top with thin slices of fresh veggies: red and yellow bell peppers, thinly sliced carrots, shredded baby spinach. Serve with your child’s favorite fruit with Greek yogurt for dipping!
Tips for Packing Made Easy
- Prep anything you can the night before. Usually for us that means cooking anything that can be cooked ahead of time, so in the morning it’s just reheating and assembling.
- Pick familiar items. If you’re planning to give your child something new in their lunch, try it out the week before so they get exposure to it a few times before you add it to their lunchbox.
- Try to choose a mix of options: Fruits, veggies, grains, protein are all great to mix and match for your child during the week.
- Pay attention to your child’s school’s allergy guidelines: Some schools allow nuts, some don’t!
- Cut veggies into small, bite sized portions: They are more likely to get eaten that way! Also figure out how your child likes to eat their veggies – do they like them softer and easier to chew, or crunchy and raw? Serve the veggies the way they like them!
- Keep in mind they may not have time to finish all their lunch. Some schools only allocate 20-30 minutes for lunch + recess. That makes it tough for kids who want to maximize playing time! Often my daughter wouldn’t finish her lunch and I’d just have her finish it as her “after school snack.”
- Serve only water or milk. Stay away from high sugar fruit juices and sodas.
- Feel free to add a small treat or crunchy snack! When it comes to treats, it’s important to choose something small (like a 1 inch by 1 inch portion) so that your child can’t get full if they just eat their treat and nothing else. A few dark chocolate chips, or a square of chocolate; a few animal crackers or graham crackers; or pretzels/cheddar bunnies/etc. are all great options.
Resource: https://pickyeaterblog.com/healthy-lunch-ideas-for-toddlers/
Fall Art Activity!
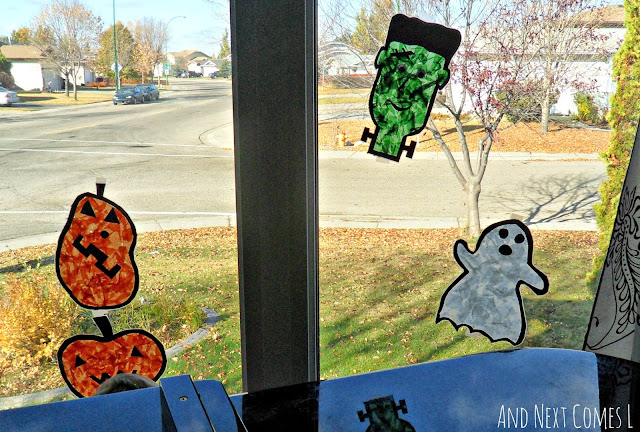
HALLOWEEN SUNCATCHERS: WHAT YOU’LL NEED
Here’s what you’ll need for this Halloween craft:
- Black construction paper
- Tissue paper in green (for Frankenstein’s monster), white (for the ghost), or orange (for the jack-o-lanterns)
- Contact paper
- Googly eyes, optional (for Frankenstein’s monster)
HOW TO MAKE HALLOWEEN SUNCATCHERS
First, you need to draw outlines on black construction paper of a ghost, jack-o-lantern, and Frankenstein’s monster. Cut it out. As an alternative, you could just draw the outline on the non-sticky side of the contact paper using permanent markers.
Next, make some details like black eyes and a mouth for the ghost, facial features for the pumpkins, and features for Frankenstein’s monster. Cut out these pieces.
Then you need to assemble the outlines and details on the sticky side of a piece of contact paper. I also put two googly eyes face down on the sticky side for Frankenstein, but this is optional.
Now the suncatchers are prepped for the kids to decorate!
Set out some tissue paper and encourage your child to rip (or cut) the tissue paper into small pieces and then placing them onto the sticky side of the contact paper.
Once the shapes are fully covered with tissue paper, place another piece of contact paper on top.
Then cut out the finished shapes to make the window art look nice and polished. And finally, hang them up on display in your windows.
